Tuesday, November 16, 2010

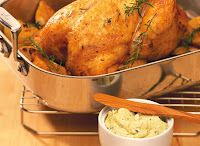
Roasted Garlic and Herb Turkey

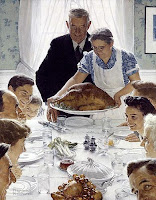
Norman Rockwell has always, even as a child, made me feel nostalgic for the things of the 1940’s and 50’s. Especially the holidays, that happens to be my favorite time. Recapturing those moments from history in the present are always in the background of my mind. My parents always created that warm feeling in our home during the holidays. I recall as a child that we always had family in our house during those times. Mom was always cooking and dad was manning the Bar with his pipe in hand. The smells of turkey cooking and the scent of cherry wood tobacco hung in the air while my sister and I were glued to the TV watching Rudolph the red nose reindeer or Frosty the snow man Claymation holiday classics.

Now what does this have to do with cooking you ask? Well, nothing really. But isn’t cooking an essential part of the holidays? Yes, I think it is. It’s an element of the overall experience. Without my Dad and his pipe and the smell of his tobacco I don’t think the memory would have been the same. I think that without a turkey or a Ham roasting in the oven, my memory would be different. I think it wouldn’t have had that Norman Rockwell feeling to it.

I share this with you because I think many of you have the same memories as a child, though some may differ in content, they overall are similar. With thanksgiving coming soon, plans for your holiday are in the making. Phone calls (or texting) are going out to friends and family to plan the day. Even now, my wife is asking me from the other room, if I’ve talked to my best friend yet. Will we have a Turkey or Ham? How many pies will we need? What special Drinks do we want to do? Is there a sale coming up for shrimp? All familiar, yet, traditional planning has commenced full throttle.

With all the planning underway the recipes flow through my mind like a rolodex of cards. What will complement my turkey? Deep fry that bad boy this year? Roast it? Smoke it? Grill it? Yes I did say Grill it. I have grilled my turkey a few times and even though its takes almost an entire day to do so, it turned out delicious. What shall I go with? I think traditional roasting will be the way to go this year. I bought a new roasting pan and I have yet to use it. So with my goal set forth I will commence with the tryptophan experience.

Roasted Garlic and Herb Turkey with Forest Mushroom And Salami Stuffing

For the roasted garlic and herb rub:

• 4 cups peeled garlic cloves (about 14 to 16 cloves)
• 3 cups extra virgin olive oil
• 1 bunch fresh rosemary leaves only, minced
• 1 bunch fresh marjoram or oregano leaves only
• ½ bunch fresh thyme leaves only

For the turkey:

• 12- to 14-lb. turkey
• Salt and pepper, to taste

For the stuffing:
• 1-oz. package dried porcini mushrooms
• 3 cups chicken or turkey broth
• 8 oz. sliced Genoa salami, finely chopped
• 1 large yellow onion, diced
• 1 stalk celery, diced
• ¼ cup chopped shallot
• 1 lb. mixed mushrooms, sliced (such as porcini, oyster, crimini, shiitake, maitake)
• 1 tsp. Kosher Salt
• ½ tsp. ground black pepper
• 14-oz. can quartered artichoke hearts, roughly chopped
• 8 oz. fontina cheese, grated and divided
• 2 eggs, beaten
• 8 cups (about a loaf) stale bread *your choice*cubed and toasted

Steps:
To make the roasted garlic and herb rub, heat the oven to 350 degrees.

Place the garlic and the olive oil in a small baking dish. Make sure that all of the garlic is covered with oil. Cover the pan with foil and roast for 1½ hours, or until the garlic is very soft and golden brown. Remove from the oven and allow cooling.

Once the garlic has cooled, drain the oil. Reserve ¼ cup of the oil for the stuffing and the rest for another use.

In the food processor, combine the garlic, rosemary, marjoram and thyme and process until smooth. Reserve ¼ cup of the mixture for the stuffing.

To cook the turkey, heat the oven to 350 degrees.

Place the turkey in a roasting pan fitted with a roasting rack. Gently loosen the skin of the turkey, being careful not to tear it. Rub the roasted garlic mixture under the skin and inside the cavity of the bird. Be sure to rub it on both the legs and the breasts, turning the bird as needed.

Rub more of the mixture on the outside of the skin, and then season the entire bird with salt and pepper.

Roast for 2½ to 3 hours, or until the breast reaches 160 F and the thickest part of the thigh reaches 170 degrees.

During roasting, turn the pan occasionally to encourage even cooking. *TIP* If the turkey begins to brown too much, tent with foil, as needed.

Allow the turkey to rest in the pan for 10 minutes before moving to a platter.

When the turkey is halfway through roasting, begin the stuffing. Coat a large casserole dish with cooking spray.

In a medium skillet over high heat, combine the ½ of the sliced mushrooms and broth. Bring to a boil, then remove the skillet from heat and allow cooling.

In a large sauté pan over medium-high, heat the reserved ¼ cup garlic oil. Add the salami and sauté until crisped and lightly browned, about 8 to 10 minutes. Add the onion, celery and shallot and continue to cook until the onion is soft and translucent. Add the remaining ½ sliced mushrooms, salt and pepper. Continue to cook until the mushrooms are tender and beginning to brown, about 5 to 7 minutes.

Remove the skillet from heat and stir in the reserved roasted garlic puree, mushroom and broth mixture, the artichoke hearts, three-quarters of the fontina and the eggs. Add the bread cubes, toss well, and then spoon into the prepared casserole dish. Top with the remaining fontina and bake for 35 to 45 minutes.

Depending on how you want to present, I recommend transferring the stuffing to a large platter placing the mound in the center then carving the turkey and laying serving size cuts around the stuffing. It really depends on you and what you what to display.

So with your taste buds fired up, and your stove and oven ready to heat the kitchen, I raise my glass to you and challenge you to have a Norman Rockwell experience. Create your holiday smells and character. Most importantly, be happy and content, and enjoy the company of your friends and family.

Finito!
Monday, November 8, 2010

Cranberry Chutney

What is in the shape of an 8oz can, jiggles unnaturally, and has a not so pleasant color? Canned cranberries! You know the stuff. At thanksgiving you see it served on good china or a Crystal severing platter. At the end of the dinner you see it almost always untouched. Now, I’m not saying that it’s not tasty, but what I am saying, is that it looks unappealing. I remember my Mom always had a few cans that she sliced into medallions thinking that this would disguise the tell tale signature of the 8 oz can mold.

I’ve been invited and attended dozens of thanksgiving dinners over the years and only on a few occasions have I seen “real” cranberries served. When I say real, I mean fresh cranberries that have been cooked and used in chutneys, sauces, and stuffing. Unless the cook has a love affair with cranberries, they are often that side item that is more of an afterthought, than an “OH, I’m ganna make this explode with flavor!”

With my children at the age when they are creating memories for a lifetime, I attempt to give them those “food memories” that I have when I was there age. I want them to remember the cranberries as a pleasure, not a terror. I don’t want them to associate cranberries with the 8oz can mold. I want them to know that Cranberries are a fruit that is delicious, nutritious and versatile. So, I struck out and played with many different dishes for the Thanksgiving table. I vaguely recall it took 5 or so years of trying different recipes and modifying ingredients to get a recipe I liked and complemented the abundance of foods traditionally served at the Thanksgiving table.

I worked on a Cranberry sauce at first, but after 2 years of the Turkey gravy and cranberry sauce turning my plate into a lake, I decided to go with a chutney. It wasn’t quite a stuffing nor, was it the gelatinous jelly mold. It was something in between that seems to go with everything and still eye appealing. In the end, I repeated the recipe for 3 years only modifying it a time or 2 to adjust for my taste. I presented it 2 times at a Thanksgiving potluck at my church and each time both at home and at the potlucks my dish was always gone. To me that equals a successful recipe.

Cranberry Chutney

The Fixings: 
3 large shallots, coarsely chopped
1 tablespoon extra virgin olive oil
1 bag fresh or frozen cranberries
2/3 cup sugar
3 tablespoons cider vinegar
3 cloves minced garlic
3 teaspoon peeled minced fresh ginger
1/2 teaspoon kosher salt
1/8 teaspoon dried hot red pepper flakes

The How Too's:
Cook shallots in extra virgin olive oil in a heavy saucepan over moderate heat, stirring occasionally, until softened, about 3 minutes. Stir in remaining ingredients and simmer, uncovered, stirring occasionally, just until berries pop, 10 to 12 minutes.

The Aftermath:
Transfer to bowl and let cool.  Refrigerate 72 hours prior to serving so that flavors can infuse the overall dish. After the resting time, simply remove from the fridge and place in a serveing dish.  Garnish with fresh cranberrys if desired.

What I like about this recipe is that you can make this day’s prior to the event. Once, I completely forgot about the cranberries because I became so consumed with cooking the turkey.  It was a little embarrassing but I shrugged it off to having a delicious turkey cooked to perfection.  So, as always, I invite you to try this recipe out and change it to fit your desires.  Add some other fruit, pine nuts, or even some sage.  The ideas are endless!
Finito!

Tuesday, November 2, 2010

Apple Carmel Nut Pie

 
Chances are you have a family recipe for pumpkin pie. Or you have a favorite premade pumpkin pie. Or if you’re like me, you don’t really care for pumkin pie. I don’t hate the stuff. But, if given the choice during the holidays, I often pick an Apple Carmel Nut Pie. I have nothing against pumpkins. I love to grow them every year in our garden, which I’m proud to boast that we get about 9 to 10 of the buggers each year with 4 of them of pretty good size. My wife loves to bake them down and then puree’ them up so she can make various pumpkins recipes. She has become quite the accomplished baker. But, when the holidays come, we head for the pie section at our local stores and see if there is any “Apple Carmel Nut Pie”.


With the Thanksgiving feast on the way, I have been debating what kind of recipes I wanted to kick off the holiday cooking extravaganza. There still are a few weeks to go for experimenting and trying out a few new items for the Feasting table. I thought I would pick “Apple Carmel Nut Pie” if you didn’t pick up the overtone in the first paragraph. (Insert heavy sarcasm here)

I’ll be honest with you. When I first had “Apple Carmel Nut Pie” it was a frozen store bought Sara lee pie. Oh the horror of it all! How could I, you ask. Well, simply, I forgot to make pies for a thanksgiving dinner years ago. You may be wondering how I could forget such a staple of the thanksgiving table. Well, I got consumed with the damned Turkey. I had focused so much on making the perfect turkey that I forgot all about the second most important item. PIE!!!! It is funny how events often turn out. Not all things tragic have silver linings, but this shortcoming turned out for the best.
So every year, including this one, I hit the stores looking to see if my mistress of the pies, Sara Lee, has blessed me with the “Apple Carmel Nut Pie” as a selection. Sadly I have not seen them for the past several years, so I have had to make them at home. I’m hoping that a certain locally own grocery store, that I spent a few years working for will bring back my sweet temptress of the holiday diet buster, Sara Lee's “Apple Carmel Nut Pie”.

This may be a little obsessive to say the least, but I think those of you who have that favorite holiday item that you are sorely disappointed if missed each year, would agree with me when I say that some things are just a “must have” over others when it comes to the Thanksgiving table.

 
Apple Carmel Nut Pie
 

CRUST:
*you can make your own if you want but I find this just as tasty and less timely*
2 store-bought 9-inch deep-dish piecrusts

FILLING:
6-1/2 cups (about 5 or 6) Golden Delicious apples, peeled, cored, and sliced
1/3 cup packed light brown sugar
2 tablespoons lemon juice
1 tablespoon lemon zest, finely grated
3 tablespoons all-purpose flour
1/4 teaspoon ground cinnamon

CARAMEL-NUT TOPPING:
1/3 cup heavy cream
1/4 cup packed light brown sugar
1 tablespoon butter
1/2 teaspoon vanilla extract
1/2 cup chopped walnuts

The How To's:
Heat the oven to 400 degrees. Place one of the piecrusts in a 9-inch deep-dish pie plate, letting it drape over the edges.

Combine the pie filling ingredients in a large bowl, mixing well. Spoon the pie filling into the crust.

Using a pastry brush and a small amount of water, moisten the edge of the bottom crust. Add the top crust, pressing them together to seal, and mold the edge to stand upright. Poke several fork holes in the top crust. Bake the pie on a baking sheet in the center of the oven for 30 minutes. Reduce the oven temperature to 375 degrees, loosely cover the pie with aluminum foil, and continue baking for another 30 minutes.

Meanwhile, combine the cream and brown sugar in a small saucepan. Heat to a boil, then boil for 15 seconds more. Remove the mixture from the heat, whisk in the butter and vanilla extract, and set it aside.

Remove the pie from the oven and increase the temperature to 425 degrees. With a paring knife, poke several holes just inside the edge of the crust. Spoon the caramel sauce over the pie, spreading the sauce with the back of the spoon. (Some of the sauce will run down the crust and into the holes.) Sprinkle the nuts on top, then return the pie to the oven and bake for 7 minutes more, until the caramel bubbles. Allow the pie to cool for at least 1 hour before serving

In Closing:
I’ll try and convey this as gently and with as much compassion as possible. If given the option to make this pie versus buying the frozen one, I will almost always, buy the frozen one. You see, sometimes, having a real Twinkie, is much better than a dolled up, high costing, high end Twinkie look-a-like. It just won’t replace the original. Happy Holiday my friends!

Finito!